Ta Da! Pernfors Place Renovation Reveal
- kpernfors
- Jan 11, 2023
- 7 min read

I have been dreaming of a partial kitchen renovation for a couple of years. I was done with our main area floor plan, and saw the vision of a completely open concept with a gigantic island, with seating for nine. Well, I'm happy to say that it's finally completed, and I'm excited to share the end result with you, and give you a little "behind the scene" look.
Let me just touch on the subject of "reveals" briefly. I know we all love HGTV, and love the big reveal at the end when the homeowners "oh" and "ah" over their renovated house for the first time. Makes for great TV, but it's not reality!
I have clients ask me about this every now and then, wanting that moment of giddiness over rediscovering their space, and getting a little disappointed when I break the news that it won't happen.
Why "Reveal" is Not Reality? First of all, most people live in the space while the renovation, or redecoration, is being done. It's hard to be "surprised" when you see the daily progress! Secondly, most people also want to be a part of the selection process. You want to know what the designer is buying, and you definitely want to approve the purchases. Thirdly, most of the furniture and accessories used in TV shows are for staging purposes, and are not the homeowners own furniture. Ever noticed that they never incorporate any "old" pieces unless there is an interesting story around them?! So, just keep that in mind next time you watch HGTV. The big end reveal is all for you, the TV audience, not the home owner. They most likely have already seen it, or won't get to keep the furniture after filming is done. Same thing here - today's reveal is all for you. Me, I lived through the dust, discussions, delays, issues, frustrations, and second-guessing, but I wouldn't have it any other way!
A little background to our project When we picked our floor plan about five years ago the separation between what was considered formal living/dining room, and kitchen/family room was perfect. That meant I could take the the formal parts and turn into my office and studio, where I did a lot of in-person workshops, makeup sessions, and consultations.

Since the pandemic most of my workshops are now virtual, which left us with a lot of unused space in our house, and that is one of my pet peeves. Unused, or under-utilized square-footage is something that makes me itch...
We also love to entertain, and do it quite frequently, which gave me an idea for the changes we could make to our house in order to maximize the usage, and turn it into an entertainers dream.
Full disclosure, my husband was NOT onboard with my ideas to start with, so I had to be pretty creative with both budget and execution in order to convince him we should go ahead, since it really couldn't be done without him noticing;) And by the way, he now LOVES it, so yes, I'm going to say it: "Told you so!"
Here are some of the cost saving options we incorporated:
Keeping Plumbing Intact: By not moving any appliances you don't need to touch the plumbing, which is a huge cost savor. Once the plumbing gets moved you most likely need to dig into the concrete slab, and that's a whole different ballgame. Our kitchen stayed intact except for a couple of non-load-baring walls coming down, which required patching up the tile flooring and ceiling, but not replacing the entire floor.
IKEA Kitchen Cabinets: Their cabinet boxes are super inexpensive, and I love their drawer systems. I didn't love their options for drawer fronts and doors, so we went with a company that specializes in updates specifically for IKEA furniture called Semihandmade. A little more pricey than the IKEA options, but a lot more stylish and interesting in my mind.
Doing a Lot of Work Ourselves: We are no contractors, that's for sure, but there are a lot of tasks that can be done without any major trade skill. In our case, I did all the painting myself. I don't mind it, and I'm actually really good at it, if I may say so.... I also did a lot of caulking of trim, and installation of new baseboards. My husband assembled all the IKEA cabinets and drawers, attached the doors and drawer fronts, and we mounted all the handles. All of those things takes patience and attention to detail, but nothing that not everyone can do.

Living through any renovation is daunting. Everyday there's a new layer of dust everywhere, and people constantly come and go through your house, but you have to keep your eyes on the price! It's a little bit like childbirth - in the mist of it, you swear to never do it again, but once you're through it, you quickly forget the bad parts when you experience the final result.
So without further ado, here is our renovation picture recap:
BEFORE:

DURING:

AFTER:


The mixed material in the island was inspired by a charcuterie board!
The hard coolness of the stone mixed with the warmth and softness of the wood really intrigued me. I hadn't seen it before, but I figured I had to give it a try. Although it wasn't pain-free (especially for the installers!), I'm so happy with the outcome. The wood is pre- made, untreated butcher block that I stained and sealed myself to get the exact shade I wanted. To add more warmth to the hard contrast of black and white, I included the butcher block feature in the ceiling above the island, and the counter of the dining room sideboard.

One of my favorite elements are the two bookshelves I designed and had custom made for each side of the island, where I keep all my cook books. I had them matched and painted the same color as the cabinet drawers and doors.
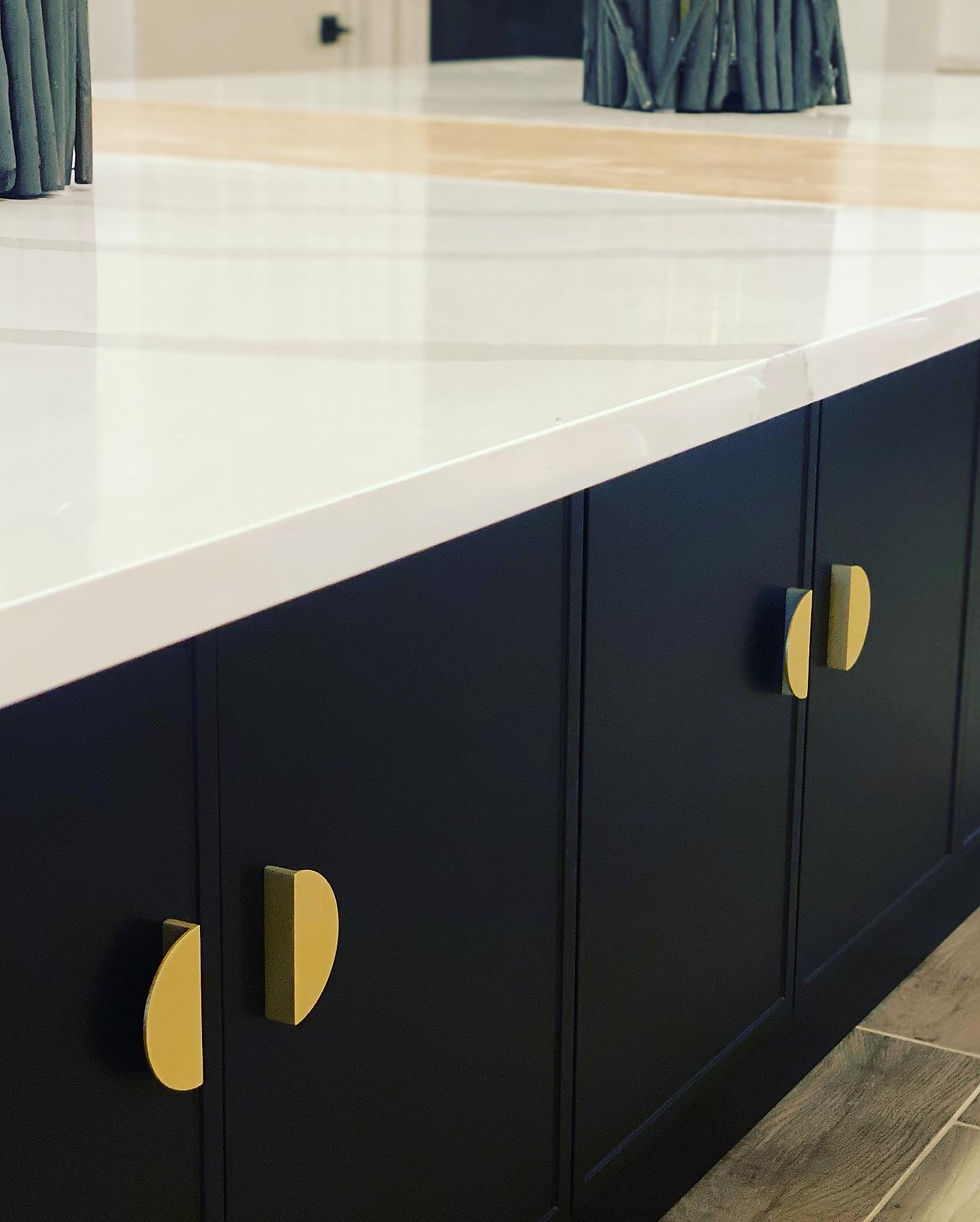
I probably tried out 20 different hardware samples before I found these ones on Amazon. I absolutely love their modern, yet timeless art-deco feel. Hardware truly is the jewelry of your kitchen!
One thing that has bothered me with our kitchen since moving in was the uncovered side of the fridge. With the pantry wall gone, and replaced with an island, the fridge became very exposed, and a bit of an eye sore.

Since we were not gutting the whole kitchen, and saving money by not moving appliances, I had to come up with an idea to dress it up a little, without building an entire new wall. Inspired by a plant trellis, I built (yes, all by myself, contrary to comments on social media!) this simple, decorative "fridge magnet" that does the trick of making it look a little more interesting, without obstruction (you need easy access to back of fridge in case there is a problem). With magnets glued onto the wood, it simply latches on to the fridge metal - couldn't be any easier!
I also made a reel for social media, which has gone a bit viral! You can check it out for yourself for a quick step-by-step DIY guide to building my new fridge jewel:

Why did I pick black doors, drawer fronts, and accents?
Working with interiors, there has been a lot of gray walls and white kitchen cabinets over the last couple of year, and I wanted something new. In my opinion, black is a fantastic neutral. Black and white is also the most contrasting colors you can use together, and can create a lot of drama with very little effort. I've always loved combining the two in both interiors and clothing, and black and white never goes out of style.
Last year, I painted the walls in my new butlers pantry a very, very dark charcoal gray from Sherwin Williams called "Iron Ore" SW7069, and absolutely loved it. So, while the paintbrushes were out, I decided to take my black and white theme from the kitchen a little further.
Our 13 year old daughter wanted to leave her "kid" room behind, and move into the slightly larger guest room, which left me with a pink ceiling and an equally pink bathroom to get creative with, so I did. And you probably guest it by now - I went black (or technically dark charcoal) again!
A common misconception is that dark colors always make a space look smaller. It's not true. Actually, tests have shown that light colors advance (seems to be closer), and dark colors recede (seems to be further away), which technically would mean that the dark room would seem bigger, but other factors, like lighting, plays in as well. To put it simply - don't be afraid of dark colors.
More than spacial effects, colors create a certain mood in a room. Dark walls can feel very classy, even "sexy" in my book, especially in smaller rooms where it won't dominate too much. So let me introduce you to my new, dramatic guest bath that didn't require any renovation more than new paint, hardware, and accent pieces:


I did a little step-by-step reel for this transformation as well:

Another fun design opportunity that is often missed is the ceiling. The ceiling is in fact your 5th wall, and can be spruced up in so many fun ways; with trim, textured panels, wallpaper, or simply just paint! I kept my theme and painted the ceiling the same black as the bathroom, which I think gives a cozy vibe for our guest room. I also decided that the bi-fold closet doors could use a little TLC, so they got the same treatment:

There you have it - the Pernfors Place Renovation. I hope it gave you inspiration and ideas for your own home. We couldn't be happier with the result. As I said, living through any renovation stressful, but temporary. If there are areas in your home that irritates you, it can definitely affect your mood. Your home is your heaven, and should make you at peace. So, a little discomfort can definitely be worth years of pleasure!
Are we done with renovations for now? Don't tell my husband, but I think NOT! Stay tuned...
As always, don't forget - Chic Happens!


Comments